Rediscovering Vulnerabilities with CodeQL MRVA
Setting up Multi-Repository Variant Analysis, writing a CodeQL query to find LDAP injection, and scanning a thousand repositories to rediscover a bug in a 24k-star project.

Note
I originally wrote this article for my previous company, Hackcyom. You can also read it on their website: Rediscovering vulnerabilities with CodeQL MRVA.
A while ago a friend sent me a link to a blog post by Maikypedia titled “Finding Vulnerabilities with MRVA CodeQL”. I found myself captivated by CodeQL and MRVA, prompting me to embark on a deeper exploration. In this article my aim is to guide you through the journey of configuring MRVA, crafting a CodeQL query designed to uncover LDAP injection vulnerabilities, and sharing my discovery of such a vulnerability within a GitHub repository boasting over 24,000 stars. So, without further ado, let’s dive right in!
So what’s CodeQL again?
CodeQL is a software analysis tool designed to help developers find vulnerabilities and software bugs in their code. It works with a wide range of programming languages, understands how code behaves, and allows developers to create custom checks for their projects. CodeQL is like a detective for your code, helping you spot and resolve issues before they become problems. In this article we’ll explore how one part of CodeQL, MRVA, works and how you can use it to make your code safer and more reliable.
What’s MRVA and how to set it up?
MRVA means Multi-Repository Variant Analysis. In a nutshell, MRVA is a capability of the CodeQL extension that enables researchers to analyze security vulnerabilities across up to 1000 repositories without ever leaving the comfort of Visual Studio Code. Pretty neat, right?
Before running variant analysis, we need to specify a “controller repository”. This repository will serve as the central hub for running the analysis using GitHub Actions. To get started, follow these steps:
- Open Visual Studio Code and make sure you have the CodeQL extension installed.
- On the left sidebar, click on “QL” to display the CodeQL extension.
- Expand the “Variant Analysis Repositories” section.
- Click on “Set up controller repository” to set the controller repository.
- In the pop-up field, enter the owner and name of the GitHub repository you want to use as the controller repository. This repository can be empty but must have at least one commit.
- Press the Enter key to save the repository information.
If prompted, you may need to authenticate with your GitHub account to allow the CodeQL extension to access the specified controller repository. Follow the instructions and sign in with your personal or organization GitHub account.
Note
If you plan to analyze public repositories, the visibility of the controller repository can be set to “public”, and the variant analysis will be free. However, if you intend to analyze private or internal repositories, the controller repository must have “private” visibility. In this case, any Actions minutes used above the free limit will be charged to the repository owner as per GitHub Actions billing:
| Plan | Storage | Minutes (per month) |
|---|---|---|
| GitHub Free | 500 MB | 2,000 |
| GitHub Pro | 1 GB | 3,000 |
| GitHub Free for organizations | 500 MB | 2,000 |
| GitHub Team | 2 GB | 3,000 |
| GitHub Enterprise Cloud | 50 GB | 50,000 |
Let’s create a CodeQL query!
CodeQL’s queries are easy. And hard. They’re both. At its core, a CodeQL query is a set of predicates that define specific code patterns. Think of predicates as building blocks, where each one represents a condition to be matched in the codebase. These queries allow us to delve into our source code and identify potential vulnerabilities or patterns that might lead to bugs. I’ll go more into the how and why in this section, but for now, let’s create a query for LDAP injection!
Concepts
One of the key aspects of CodeQL is its ability to model codebases and perform codebase distribution. This means that CodeQL can analyze code written in different programming languages and frameworks.
To write queries in CodeQL, you define classes and modules that model the specific code structures and behaviors you want to analyze. For example, when creating a query for LDAP injection, you would define classes for LDAP queries, escape functions, and relevant libraries or methods used for LDAP operations.
When running a CodeQL query, you define a taint tracking configuration that specifies the sources, sinks, and sanitizers for the taint analysis. A taint tracking configuration refers to the setup of rules and definitions that specify how the analysis should track and trace the propagation of potentially malicious or untrusted data, known as “taint”, within a program.
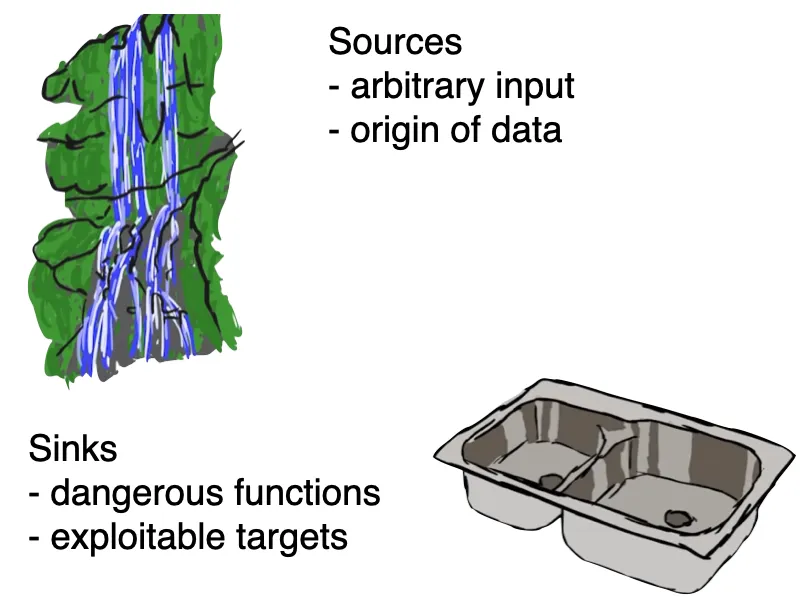
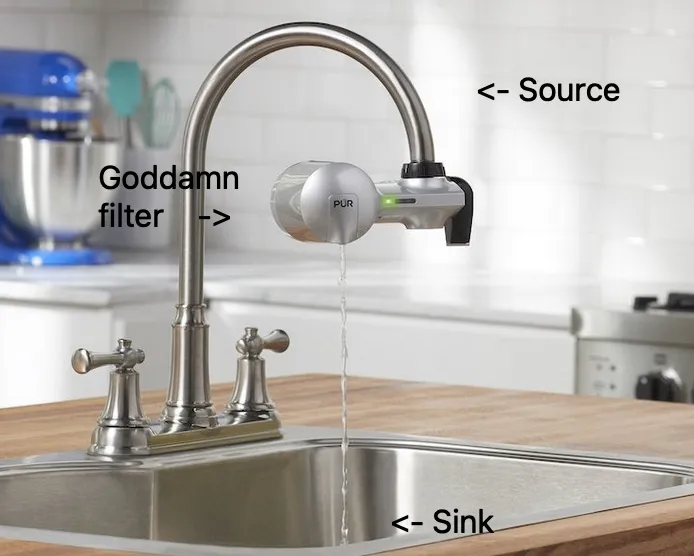
The concept of taint checking is to identify variables or data that can be modified by an external user or an untrusted source, such as user input from a web form. Taint analysis helps to identify potential security risks associated with this untrusted data and track its flow through the program. Sources are the inputs or data that could be potentially manipulated by an attacker, sinks are the vulnerable points where the manipulated data can cause harm, and sanitizers are the functions or methods that sanitise or validate the data.
Once you’ve successfully identified the sources and sinks in your code, your main mission is to establish whether data from a source ultimately makes its way to a sink. This objective can be tackled using various approaches.
For instance, in a scenario where you have 5 sources and 60 sinks, it’s relatively straightforward. You can trace the pathways from each source to their final destination in a sink. However, the situation takes on a more intricate dimension when you’re dealing with 60 sources and only 5 sinks. In such cases, individually tracking each source becomes a troublesome task. This is when you’ll change your approach and use a new method that involves starting from the sinks and tracing back to pinpoint the corresponding source.
In essence, the approach you choose depends on the specific circumstances of your code. This is where CodeQL proves invaluable. It automates the process of locating vulnerabilities by using your defined sources and sinks, along with the conditions you specify, like asking, “Can my source data reach a sink without passing through a sanitizer?” CodeQL adapts to your specific case, helping you identify and address potential issues efficiently.
Tip
LiveOverflow made a great video about it — I highly recommend it if you’re new to these concepts: Sources and Sinks — Code Review Basics.
Building the query
Given that my primary objective is to demonstrate how to use MRVA, I won’t be going into the nitty-gritty details of CodeQL query creation in this post (perhaps that’s a topic for another blog post down the road?). Instead I’ll provide a condensed summary of Maikypedia’s explanation and query creation process. While Maikypedia’s post goes into more depth about the intricacies of how and why, I’ll strive for greater clarity and conciseness here.
Note
Modeling LDAP libraries involves creating classes and queries to identify relevant LDAP query methods, escape methods, and configuring taint tracking. While the process is similar in Python 2 and Python 3, there are some differences due to changes in syntax and library structure.
The main “structures” we’ll need in the taint tracking configuration are:
- LDAP queries with a predicate to get the argument holding the query to be executed. (Link)
- LDAP escape functions with a predicate to get the argument holding the input being escaped. (Link)
In both Python 2 and Python 3, the first step is to create classes that represent LDAP query methods. For example, to model the search_s method as a query method, you can create a class like this:
class LDAPQueryMethods extends string { LDAPQueryMethods() { this in ["search", "search_s", "search_st", "search_ext", "search_ext_s"] }}This class helps identify the LDAP query methods you want to analyze, ensuring you focus on the relevant parts of the codebase.
Next, you use CodeQL queries to locate instances where the LDAP query methods are used. For instance, to find the usage of the search_s method:
from string method where method = "search_s" and method instanceof LDAPQueryMethodsselect methodThis query identifies places where the search_s method, or similar query methods, is used.
Modeling escape methods in both Python 2 and Python 3 follows a similar pattern to query methods. You create classes and queries specific to escape methods like ldap.dn.escape_dn_chars and ldap.filter.escape_filter_chars.
The final step in modeling LDAP libraries with CodeQL is configuring taint tracking to identify potential vulnerabilities. Here’s an example of a taint tracking configuration:
class LDAPInjectionFlowConfig extends TaintTracking::Configuration { LDAPInjectionFlowConfig() { this = "LDAPInjectionFlowConfig" }
override predicate isSource(DataFlow::Node source) { source instanceof RemoteFlowSource }
override predicate isSink(DataFlow::Node sink) { sink = any(LDAPQuery ldapQuery).getQuery() }
override predicate isSanitizer(DataFlow::Node sanitizer) { sanitizer = any(LDAPEscape ldapEsc).getAnInput() }}This configuration specifies sources, sinks, and sanitizers to identify potential data flows that might lead to LDAP injection vulnerabilities.
The main difference between Python 2 and Python 3 modeling lies in adapting the queries and classes to the specific syntax and library structure of each version. In Python 2 you might use classes like LDAP2QueryMethods, whereas in Python 3 it would be LDAP3Query. Similarly, the library imports and method calls differ between the two versions. The overall modeling process, including query creation and taint tracking, remains consistent.
So we end up with this final query:
/*** @name LDAP query built from user-controlled sources* @description Building an LDAP query from user-controlled sources is vulnerable to insertion of* malicious LDAP code by the user.* @kind path-problem* @problem.severity error* @id py/ldap-injection* @tags experimental* security* external/cwe/cwe-090*/
import pythonimport semmle.python.dataflow.new.TaintTrackingimport semmle.python.dataflow.new.RemoteFlowSourcesimport semmle.python.ApiGraphsimport DataFlow::PathGraph
module LDAPQuery { abstract class Range extends DataFlow::Node { abstract DataFlow::Node getQuery(); }}
class LDAPQuery extends DataFlow::Node { LDAPQuery::Range range;
LDAPQuery() { this = range }
DataFlow::Node getQuery() { result = range.getQuery() }}
module LDAPEscape { abstract class Range extends DataFlow::Node { abstract DataFlow::Node getAnInput(); }}
class LDAPEscape extends DataFlow::Node { LDAPEscape::Range range;
LDAPEscape() { this = range }
DataFlow::Node getAnInput() { result = range.getAnInput() }}
class LDAP2QueryMethods extends string { LDAP2QueryMethods() { this in ["search", "search_s", "search_st", "search_ext", "search_ext_s"] }}
class LDAP2Query extends DataFlow::CallCfgNode, LDAPQuery::Range { DataFlow::MethodCallNode searchMethod;
LDAP2Query() { searchMethod.getMethodName() instanceof LDAP2QueryMethods and searchMethod.getObject().getALocalSource() = API::moduleImport("ldap").getMember("initialize").getACall() and this = searchMethod.(DataFlow::CallCfgNode) }
override DataFlow::Node getQuery() { result in [ searchMethod.getArg(0), searchMethod.getArg(2), searchMethod.getArgByName("filterstr") ] }}
class LDAP3Query extends DataFlow::CallCfgNode, LDAPQuery::Range { DataFlow::MethodCallNode searchMethod;
LDAP3Query() { exists(DataFlow::CallCfgNode connectionCall | connectionCall = API::moduleImport("ldap3").getMember("Connection").getACall() and searchMethod.getMethodName() = "search" and searchMethod.getObject().getALocalSource() = connectionCall and connectionCall.getArg(0).getALocalSource() = API::moduleImport("ldap3").getMember("Server").getACall() and this = searchMethod.(DataFlow::CallCfgNode) ) }
override DataFlow::Node getQuery() { result = searchMethod.getArg([0, 1]) }}
class LDAP2EscapeDNCall extends DataFlow::CallCfgNode, LDAPEscape::Range { LDAP2EscapeDNCall() { this = API::moduleImport("ldap").getMember("dn").getMember("escape_dn_chars").getACall() }
override DataFlow::Node getAnInput() { result = this.getArg(0) }}
class LDAP2EscapeFilterCall extends DataFlow::CallCfgNode, LDAPEscape::Range { LDAP2EscapeFilterCall() { this = API::moduleImport("ldap").getMember("filter").getMember("escape_filter_chars").getACall() }
override DataFlow::Node getAnInput() { result = this.getArg(0) }}
class LDAP3EscapeDNCall extends DataFlow::CallCfgNode, LDAPEscape::Range { LDAP3EscapeDNCall() { this = API::moduleImport("ldap3") .getMember("utils") .getMember("dn") .getMember("escape_rdn") .getACall() }
override DataFlow::Node getAnInput() { result = this.getArg(0) }}
class LDAP3EscapeFilterCall extends DataFlow::CallCfgNode, LDAPEscape::Range { LDAP3EscapeFilterCall() { this = API::moduleImport("ldap3") .getMember("utils") .getMember("conv") .getMember("escape_filter_chars") .getACall() }
override DataFlow::Node getAnInput() { result = this.getArg(0) }}
class LDAPInjectionFlowConfig extends TaintTracking::Configuration { LDAPInjectionFlowConfig() { this = "LDAPInjectionFlowConfig" }
override predicate isSource(DataFlow::Node source) { source instanceof RemoteFlowSource }
override predicate isSink(DataFlow::Node sink) { sink = any(LDAPQuery ldapQuery).getQuery() }
override predicate isSanitizer(DataFlow::Node sanitizer) { sanitizer = any(LDAPEscape ldapEsc).getAnInput() }}
from LDAPInjectionFlowConfig config, DataFlow::PathNode source, DataFlow::PathNode sinkwhere config.hasFlowPath(source, sink)select sink.getNode(), source, sink, "$@ LDAP query parameter comes from $@.", sink.getNode(), "This", source.getNode(), "a user-provided value"Pretty big! However, this level of detail represents the highest degree of comprehensiveness achievable while maintaining a general approach.
Let’s scan the world! Or maybe just a thousand repositories?
Now that we have set up MRVA and that our query is built, what’s left? Well, scanning repositories! That’s why we’re here after all, isn’t it? To start scanning is pretty simple and straightforward.
In the Variant Analysis Repositories panel, you’ll begin by adding the repositories you want to analyze. It’s as simple as clicking the ‘+’ icon and selecting either ‘From a GitHub repository’ or ‘All repositories of GitHub org or owner’ from the dropdown menu. Then you’ll type in the identifier of the repository or organization you’re interested in.
Once you’ve selected your repositories, it’s time to create a custom list. Managing these lists is easy. All you need to do is right-click on either the list name or a repository name within the list, and a context menu will appear with various options. These custom lists are neatly stored in your workspace within a databases.json file.
To give you a clearer picture, here’s an example of how to create your custom list:
{ "name": "new-repo-list", "repositories": [ "facebook/create-react-app" ]}With your repositories selected and your custom list in place, you’re ready to run your CodeQL query against them. Once the workflow to run your analysis on GitHub is initiated, a Variant Analysis Results view will open to display results as they become available. You can use this view to monitor progress, check for errors, and access the workflow logs in your controller repository.
Once your variant analysis run is scheduled, the results view will automatically open. To explore the detailed results for a repository, including result paths, simply click on the repository name. You can also dig into the information available for each result using links to the source files on GitHub.com and, for data flow queries, the ‘Show paths’ button will show the paths found.
So what about us? In our case, we’ll select repositories that use ldap3.
Discovering a vulnerability in a GitHub repository
After scanning, I found myself faced with just a single result. To be completely transparent, I couldn’t help but feel a tinge of disappointment. Now the big question loomed: what is this bug, and is it genuinely a vulnerability?
In short, this is the flow:
def login(org_slug=None): # ... code ... if request.method == "POST": ldap_user = auth_ldap_user(request.form["email"], request.form["password"])
# ... code ...
def auth_ldap_user(username, password): server = Server(settings.LDAP_HOST_URL, use_ssl=settings.LDAP_SSL)
# ... code ...
conn.search( settings.LDAP_SEARCH_DN, settings.LDAP_SEARCH_TEMPLATE % {"username": username}, attributes=[settings.LDAP_DISPLAY_NAME_KEY, settings.LDAP_EMAIL_KEY], )Turns out, it is! We can clearly see that an LDAP injection is possible! The user input from the email and password is directly given to the function auth_ldap_user, which doesn’t sanitize the inputs and directly goes into the search.
I was thrilled by now, since the repository has around 24 thousand stars. That could have been a significant discovery. However, in light of the apparent simplicity of the bug, I decided to do my due diligence and checked the repository’s issues and any possible previous reports. Unfortunately, my enthusiasm was short-lived because someone had beaten me to it! :(
Upon further examination of the issue, I discovered that the maintainers had an interesting take on it. They seemed to believe that since the bug only exposed usernames or (internal) emails, it wasn’t a major cause for concern, and thus they didn’t address it. What’s peculiar is that the report also included a readily available fix, just waiting to be pulled from the researcher who warned them.
Anyway, that’s it for this post!
Conclusion
CodeQL is cool, use it! Well, that’s what I’d like to say, but that wouldn’t be much of a conclusion. You’ve just gained more insights into MRVA and CodeQL, so why not take a deeper dive into this tool? You can start by crafting your own queries, scanning your own projects, and actively reporting any bugs you come across. There’s a wealth of blog posts online that go into different aspects of CodeQL, so embrace your curiosity and start exploring!