Binary Ninja: Zero to Hero 2
Hello everyone~! Today I am back with another part of the serie Binary Ninja: Zero to Hero 2! I am very excited to post this part, as the next part will start diving into the API. As said previously, in this post we will explore additional plugins, delve into different views such as the *LIL and SSA, and unlock the full potential of Binary Ninja’s UI with tools like the stack view, tags, and the memory map.
Binja UI tour
So, let’s do a tour of Binja’s UI and see how each components can be useful (and used).
*LIL and SSA
*LIL are LLIL, MLIL and HLIL. They all have different level of abstraction, and you can learn much more about it by reading this blog post from Trails of Bits. I will nonetheless talk about it, just not as in depth as it’s not currently necessary.
LILL
LLIL is the lowest level of abstraction. The semantics of each assembly instruction are represented in the LLIL, with a one-to-one correspondence between the original instructions and the LLIL. This level of IL provides a simplified, architecture-independent representation of the assembly language instructions docs.binary.ninja.
Here is an example of how a x86 assembly instruction might be represented in LLIL:
1
mov eax, 2
This could be represented in LLIL as:
1
2
3
4
LLIL_SET_REG
├─── eax
└─── LLIL_CONST
     └─── 2
MLIL
MLIL takes the LLIL and further simplifies it by combining multiple low-level instructions into single operations. This level of IL starts to look more like high-level source code, with complex assembly idioms and patterns translated into simpler constructs. It also introduces the concept of variables and types, which are not present in the LLIL. It can be used to perform more high-level analysis tasks, such as identifying variables and their types, tracking their usage, and modeling data flows docs.binary.ninja.
Here is an example of how the following x86 assembly instructions might be represented in MLIL:
1
2
3
mov eax, [ebp+8]
add eax, 1
mov [ebp+8], eax
This could be represented in MLIL as:
1
var_8 = var_8 + 1
HLIL
HLIL is the highest level of abstraction provided by Binary Ninja. It simplifies the MLIL even further to produce a representation that is very close to the original source code, with constructs like loops and conditionals represented in a way that is very similar to high-level programming languages. This makes it easier to understand the overall logic and control flow of the program.
Here is an example of how the following C code might be represented in HLIL:
1
2
3
for (int i = 0; i < 10; ++i) {
    printf("%d\n", i);
}
This could be represented in HLIL as:
1
2
3
4
int32_t i;
for (i = 0; i < 10; i = i + 1) {
    printf("%d\n", i);
}
SSA (Single Static Assignement)
The term “single static assignment” refers to a property of the intermediate representation of a program. The key idea is to ensure that each variable is assigned a value exactly once within a specific scope. This property simplifies many aspects of program analysis and optimization, as it eliminates issues related to variable reassignment, making it easier to reason about the program’s behavior. Indeed, SSA form resolves questions of scoping and which definition of a variable should be used. A special φ function is used at join points.
If I presented you this CFG and asked “what is the value of X?”, your first question should be “which X?”.
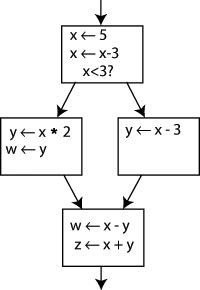 CFG without SSA (taken from Wikipedia)
However, if I were to present this CFG in the SSA form and asked “What is the value of X2”, you would be able to answer “2”.
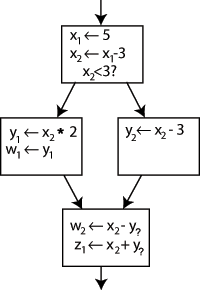 CFG with SSA (taken from Wikipedia)
Now, you may observe the presence of “Y?” in the code. This is because, at times, a variable’s value is contingent upon various branches, such as conditions and loops. In such instances, one might wonder about the variable’s potential values. In these cases, you specify the two potential values within a Φ (Phi) function. In this context, the statement will create a fresh definition of Y, referred to as Y3, by “selecting” either Y1 or Y2 based on the previous control flow.
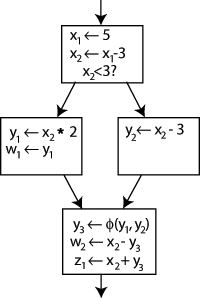 CFG with SSA and phi (taken from Wikipedia)
This feature is built-in Binja, and it’s great. I’ll showcase in future posts how you could use it. Here is what it looks like:
Stack View
The stack view lives up to its name by providing a visual representation of the stack, although it differs from the typical debugger’s stack view. Indeed, you won’t see addresses or actual data, but rather the disposition of the stack.
Here is a simple screenshot to illustrate what I am saying 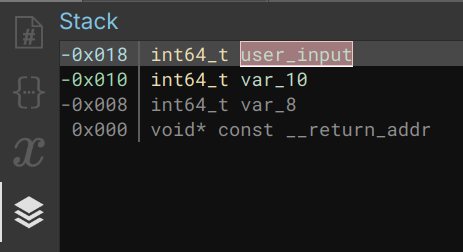 Stack View of a function
As evident, this display reveals the variable offsets within the stack, accompanied by their respective types and names. At 0x0, you can consistently locate the return address (eip/rip). The negative offsets pertain to local variables declared within the function, while the positive offsets correspond to non-local variables, frequently established through functions like malloc, calloc, and the like.
Tags
Vector35 has done an excellent job documenting tags. However, I think their documentation is more oriented on how to use them and how to implement them with the API, more than why use them, which is fair as its whats expected of a documentation. So here I am: tags are great. Its very helpful to quickly (and visually) know what you’re looking at. You can create new tags (we’ll do that in future posts!) and reference addresses/functions of interests in a few click (or line of code).
There are 19 default tags:
- Bookmarks
- Bugs
- Crashes
- Important
- Library
- Needs Analysis
- Unresolved Stack Adjustment
- Unresolved Indirect Control Flow
- Unresolved Stack Pointer Value
- Invalid Instruction
- Could not Generate Flag IL
- Unimplemented Instruction (LLIL)
- Unimplemented Instruction (MLIL)
- Unimplemented Instruction (HLIL)
- Non-code Branch
- Function too Large
- Function Exceeded Max Analysis Time
- Jump to Unhandled Relocation
- Jump to Malformed Target
Among the available tags, you might find that “Bookmarks,” “Bugs,” “Crashes,” or custom tags are the ones you use most frequently. However, if you require additional tag types, you can create them easily. To do this, navigate to the “Tags” section and access the “Tags type” view. From there, you can create a new tag type by right-clicking or using the shortcut Ctrl+i. 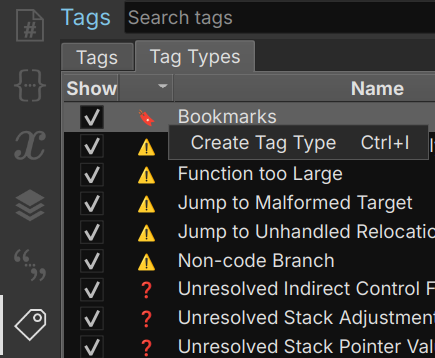 How and where to create tags
To add your newly created tag, follow these steps. Right-click on the instruction you want to tag, then choose “Tags and bookmarks” -> “Add Tag…”. This action will result in the tag being added to the list of tags associated with that particular instruction, and you’ll have the option to include a description for the tag as well. 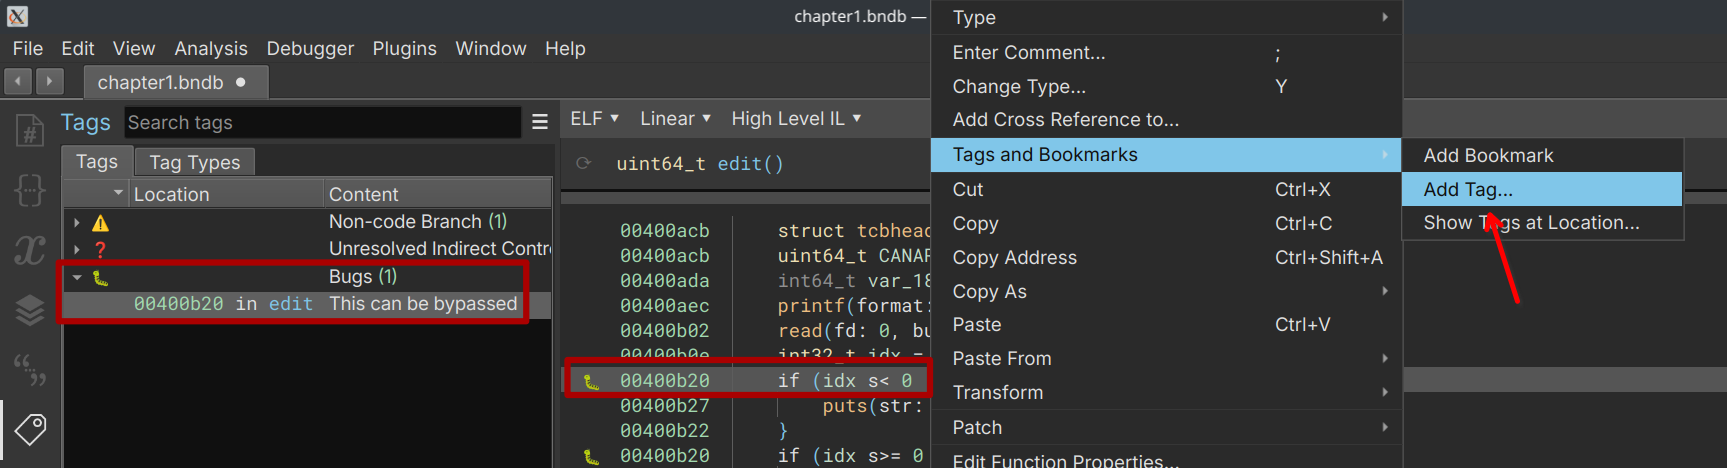 Showcase how to add tags
Now with all this new knowledge, you should be able to use the basic features of Binja without any issues. However, you’re missing one of the best (imo) feature of Binja: it’s API. This is what I’ll talk about in the next post, and show case a few simple use. See you soon!